Flare VM: Creating a Windows 10 VM
Part 1 in a series of posts providing a step-by-step guide on how to set up Flare VM, a fully configured Windows 10 virtual machine developed by Mandiant, for malware analysis. This post in particular covers the steps needed to create a Windows 10 ISO using the Windows 10 Media Creation Software, and using that ISO to create a Windows 10 virtual machine in VirtualBox.
Reverse engineering malware is a complex task that requires a secure and dedicated environment. A very effective tool for this purpose is Flare VM, a fully configured Windows 10 virtual machine developed by Mandiant. This guide is part one of two and covers the preparation needed to get started with Flare VM. Specifically, in this guide I will show you how to create a Windows 10 ISO and how to use that ISO to create a virtual machine in VirtualBox.
Required downloads:
Windows 10 Media Creation Software
Creating a Windows 10 ISO
The first step in setting up Flare VM is to create a Windows 10 ISO. To do this, you will need to download the Windows 10 media creation software from the Microsoft website. Then, use this software to create your Windows 10 ISO by following these steps:
- Select "Create installation media (USB flash drive, DVD, or ISO file) for another PC".
- When prompted for the edition and architecture of Windows 10, ensure that you select "Windows 10" as the edition and "64-bit (x64)" as the architecture.
- Finally, select "ISO file" as the output format for the installation media. This will create an ISO file that can be used to install Windows 10 on a virtual machine.
Create a Windows 10 VM Instance
Now that you've successfully created a Windows 10 ISO, it's time to use it to install Windows 10 on a virtual machine in VirtualBox. This process involves creating a new virtual machine in VirtualBox using the ISO you made previously.
Step 1:
In VirtualBox, select "New" to create a new virtual machine.
- Give your virtual machine a name, such as "Flare VM".
- For "Type", select "Microsoft Windows"
- For "Version", select "Windows 10 (64-bit)"
- For "Memory", assign at least 2GB (2048 MB) of memory (see note below) to the virtual machine. This will ensure that the virtual machine has enough resources to run Windows 10 and any additional software you may want to install.
- Select "Create a virtual hard disk now"
- Select "VDI (VirtualBox Disk Image)"
- Select "Dynamically allocated"
- For the size of your VDI, assign at least 70-80GB of storage to the virtual machine. This will ensure that the virtual machine has enough storage to install Windows 10, Flare VM, and any additional software you may want to install.
- Click "Create" to finish creating the new virtual machine.
NOTE: I would NOT reccommend using only 2gb of ram. If you selected this during setup and would like to change it, just right click your VM in the left hand sidebar and select "Settings". From there, go to the "System" tab, and change the Base Memory to be the amount you would like. I chose 6000MB, which is 6GB. While you're here, I would also reccomend going to the "Processor" tab at the top and give your machine 3-5 cores. All of this will ensure your machine runs smoothly. I would also strongly recommend disabling hyper-v on your host machine if you haven't already, or the VM will be insanely slow and basically unusable.
Step 2:
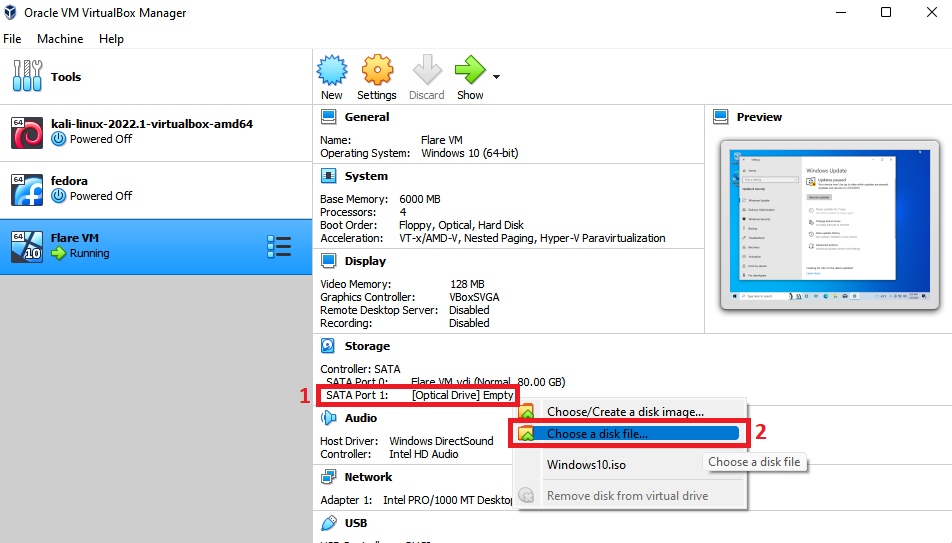
Select your Windows VM in the left sidebar of VirtualBox. Under the "Storage" option on the right, click on "SATA Port 1: [Optical Drive] Empty" and select "Choose disk file".

Select the Windows 10 ISO you created earlier. This will mount the ISO file to the virtual machine, allowing you to install Windows 10. It's just like you're putting a boot disk in to the computer before starting it up to install windows, or a repair disk... or a USB drive, if you've done it in the past decade.
Step 3:
Start your VM by double-clicking the VM in your left sidebar on VirtualBox.
Follow the Windows installation prompts. You can select "I don't have a product key" - it should be just fine for your purposes. The version you pick is ultimately your choice, but I personally chose "Windows 10 Home N". This version won't have certain media-related apps and features that I don't need to reverse engineer stuff.
When prompted, select "Custom: Install Windows Only (advanced)", as you don't have any files from a prior installation you want to move over to this new windows installation. Now you just select the disk drive you made earlier for this VM and hit next. Select your language and keyboard layout, then stare at the pretty blue screen while the dots spin until it's done. Select "Offline account" in the bottom left when asked to sign in, and "limited experience" also in the bottom left when they try changing your mind. When creating your username, Mandiant recommends using a name without spaces. Choose some security questions, then turn off all the spyware windows privacy settings. Keep telling Microsoft no thank you until you get greeted with the sweet sweet "Hi, we're getting everything ready for you" screen. Victory at last!
After the installation finally finishes, you have a few things to take care of in preperation of installing Flare VM.
Preparing your Windows 10 VM for Flare VM
Mandiant recommends doing three things prior to installing Flare VM - Disable Windows updates, disable tamper protection, and disable Windows Defender.
Disable Windows updates
- Open Settings
- Click on Update & Security.
- Click on Windows Update.
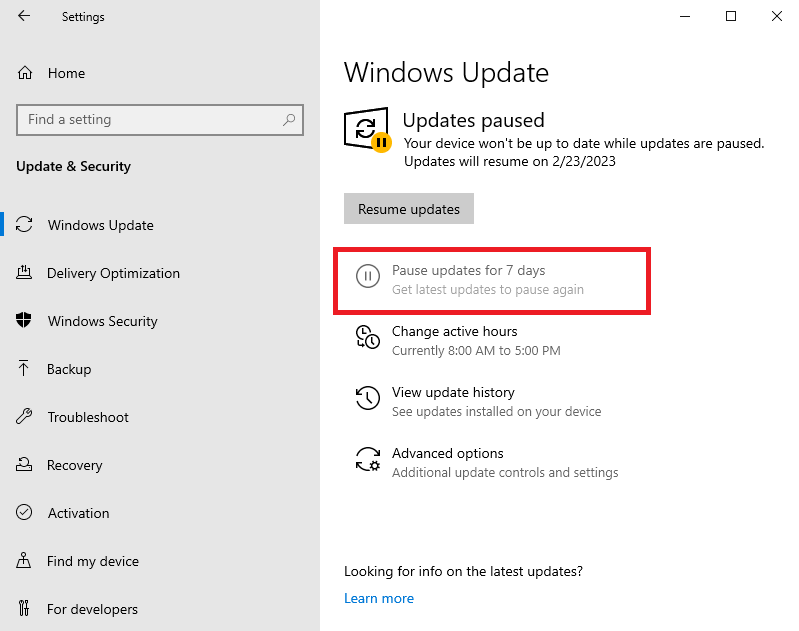
- Click the Pause updates for 7 days option as much as you'd like. I clicked it until I couldn't any more.

If you chose to download Windows 10 Pro, you have a few more options - but I'm not going to get in to them here. You can read more at windowscentral if you would like info on how to do that.
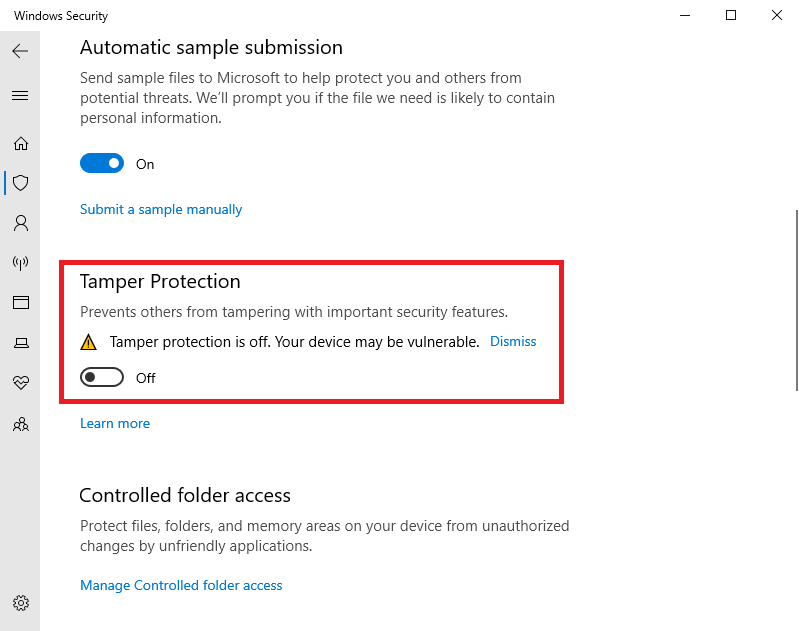
Disable tamper protection
- Open Windows Security. You can find it with a simple search in the start bar.
- Select Virus & threat protection.
- Select Manage settings under the Virus & threat protection section.

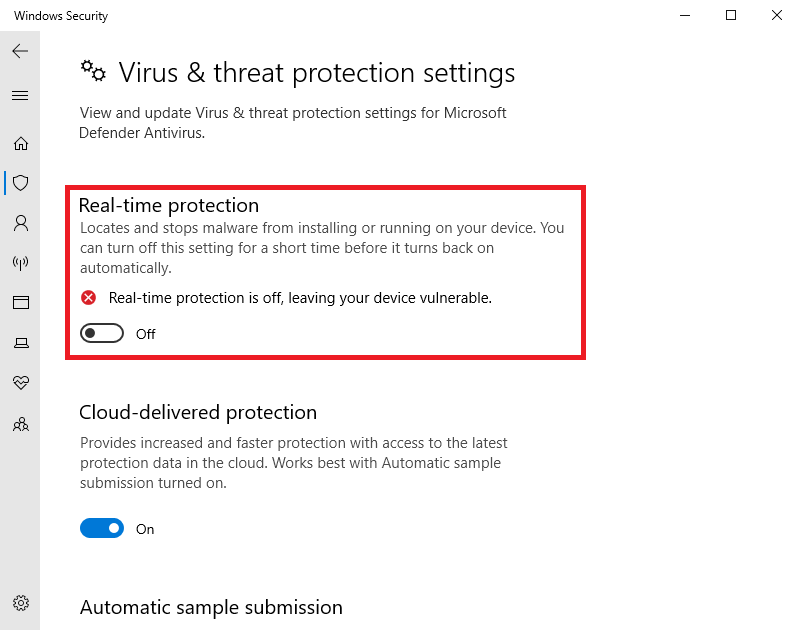
Disable Windows defender
- In the same window you opened above, turn off Real-time protection.

This should be enough, however I personally went the extra mile and ran this script by jeremybeaume to make sure everything was nice and turned off.
Conclusion
And just like that, you've created a windows 10 ISO, used it to create a Windows 10 VM, and disabled a few security settings that will hamper your malware analysis. You're now ready to move on to actually finally installing Flare VM!